Pages

Tampilkan postingan dengan label w. Tampilkan semua postingan

Kamis, 16 Juni 2016

W is for Willy Wonka Party

diy Wonka birthday party

If you follow me on Instagram then you know I was busy last week preparing for my daughter's 9th birthday party Wonka style.  Today I'm sharing all the details, sources and how to on everything I made for this diy wonka birthday party.

Let's start with the invites: wonka bars.  If you search the internet there are multiple wonka graphics out there, find one you like and then use picmonkey to make the candy bar wrappers.
Click here to continue reading »
Read More..

Sabtu, 11 Juni 2016

R is for Rolling Console


Gearing up for summer?  I know I am and last summer we desperately needed some additional counter space outdoors for serving food and drinks so I built this outdoor rolling console.


Not only does it have tons of counter and shelf space but it's totally portable!  That means I can move it anywhere with ease, so convenient.

This console appeared over at Ryobi Nation and today I have the plans here for you.


The complete plans including materials and cut lists are down below.
Click here to continue reading »
Read More..

Senin, 06 Juni 2016

W is for Workbench Inspired Desk


Hello readers!  Im over at Simpon Strong Ties blog: DIY Done Right today sharing my industrial workbench inspired desk.  I built this desk using the DIY Done Right Workbench or Shelving Hardware Kit and Ive put together plans so you can build it too!


Click here to get the step by step instructions, materials and cut lists and youll have a grand workspace that youll never want to leave!


And if youre curious about the stool click here for plans.


Disclaimer:  I have partnered with Simpson Strong Tie to bring you this desk.  I was provided materials and/or compensation to create and construct this desk.  All opinions and thoughts are my own.
Read More..

Minggu, 05 Juni 2016

P is for Pincushion with Wood Base

diy quilted pincushion with wood base

quilted pincushion with wood base

This is one project I've been thinking about for a long time and finally put myself to the task while feeling quite under the weather this week to do much of anything else.

Raid your fabric scraps to make the cutest pincushion and then I'll show you how to attach it to a solid 4x4 wood base for stability and weight.  Anytime you can combine fabric and wood in a project is a win / win in my book!

diy quilted pincushion

The finished size on the squares is 3/4" but the whole pincushion measures about 4" square and just over 2" tall.

quilted pincushion with wood base

I posted these in my etsy shop here but I show you how to make your own down below.
Click here to continue reading »
Read More..

Jumat, 03 Juni 2016

D is for DIY Workshop at The Home Depot

What better way to kick off a new week than with a big announcement!  

You all know The Home Depot is the place to shop for tools, supplies, lumber, and lawn and garden products (and you all know I shop there far more often than the grocery store).  Im so excited to tell you that Ive teamed up with The Home Depot to teach Do-It-Yourself (DIY) Workshops over the course of the year!

diy vertical planter workshop at The Home Depot

Ill be at the New Rochelle Home Depot on Saturday, April 11th at 10am where we will build a vertical planter.

The Home Depot
55 Weyman Avenue
New Rochelle, NY  10805

Click here to sign up.

New to power tools?  

Dont worry Ill show you how to make this simple planter project with user friendly power tools.  Through a step by step demonstration we will make your backyard beautiful with this vertical planter and before long youll have the skills and confidence to do it yourself.

Tight on backyard space?

This vertical planter is a great solution and customizable to fit your space.  

diy vertical planter workshop at The Home Depot

The Home Depot holds DIY Workshops on Saturdays and Sundays every month covering lots of different home maintenance and renovation topics.  We will be building a functional project for outdoors but they also have workshops on how to tile, gardening, deck staining and more.

Please come join me and The Home Depot team on Saturday, April 11th at 10am.

To register click here.

diy vertical planter workshop at The Home Depot
See you there!

 *The Home Depot partners with bloggers such as me for DIY Workshop program.  As part of this program, I received compensation for my time.  They did not tell me what to purchase or what to say about any product mentioned in these posts.  The Home Depot believes that consumers and bloggers are to form their own opinions and share them in their own words. The Home Depot’s policies align with WOMMA Ethics Code, FTC guidelines and social media engagement recommendations.
Read More..

Senin, 23 Mei 2016

B is for Bookrack


Today Im sharing free plans to build this wall bookrack over at Pretty Handy Girl.

If you have tons of kids books like Brittany and I then you know just how handy this bookrack could be!  Get the plans here and build your own.


Read More..

Jumat, 20 Mei 2016

W is for Wallpaper Wall Art Giveaway

diy wallpaper wall art (and a giveaway too!)


Wallpaper makes an easy solution for adding pattern and texture to your wall and you don't have to wallpaper the whole wall either.  I was challenged by the folks at Porch.com to make something fun and creative using wallpaper for a pattern play project.  And I actually came up with two projects: wallpaper wall art and wallpaper flower bouquet.


If you're not familiar with Porch.com yet they are a home network with connections to accredited home improvement professionals.  It is a giant information source for all things home and DIY, definitely check it out!

Porch.com teamed up with Scout & Nimble to supply us with wallpaper and I choose this Graham & Brown Kensington English rose pattern:  


Originally I never planned on coloring the flowers however when the wallpaper arrived all the beautiful black and white hand-drawn details had me looking at this paper like a coloring book.


Click here to continue reading »
Read More..

Selasa, 17 Mei 2016

P is for Personalized Pillows

How to make simple personalized pillows.  A sewing project that makes a great gift and pretty decor too!


In case you're wondering I made these pillows for my friend Jen at The House of Wood as a thank you gift.  She has two little ones so I made one pillow for her daughter and one for her son.

Unknowingly her daughter's pillow fits right in on her cuter than cute diy toddler bed, look below!


Since my little lady doesn't have a nightstand and I have yet to build her one (it's on the list!), I whipped up this adorable shelf out of scrap wood to house (hehe - get it?) a few of her favorite bedtime books. Tutorial coming soon. I built her toddler bed (free plans available on the blog!) and I make and sell those wood name signs in my Etsy shop. Did you spy her pretty personalized pom-pom pillow? That was lovingly handmade by Jaime from @thatsmyletter. ??
A photo posted by Jen Woodhouse | House of Wood (@jenwoodhouse) on
Click here to continue reading »
Read More..

Minggu, 08 Mei 2016

W is for Wood Banner with Leather Lettering

wood banner with leather lettering

wood banner with leather lettering handmade

I've had a bug about using leather scraps lately and finally figured out a way to incorporate them into wall art.

leather lettering on wood banner

Leather, wood and rope are a few of my favorite things and I put them altogether to make these wood wall banners.

Click here to continue reading »
Read More..

Selasa, 26 April 2016

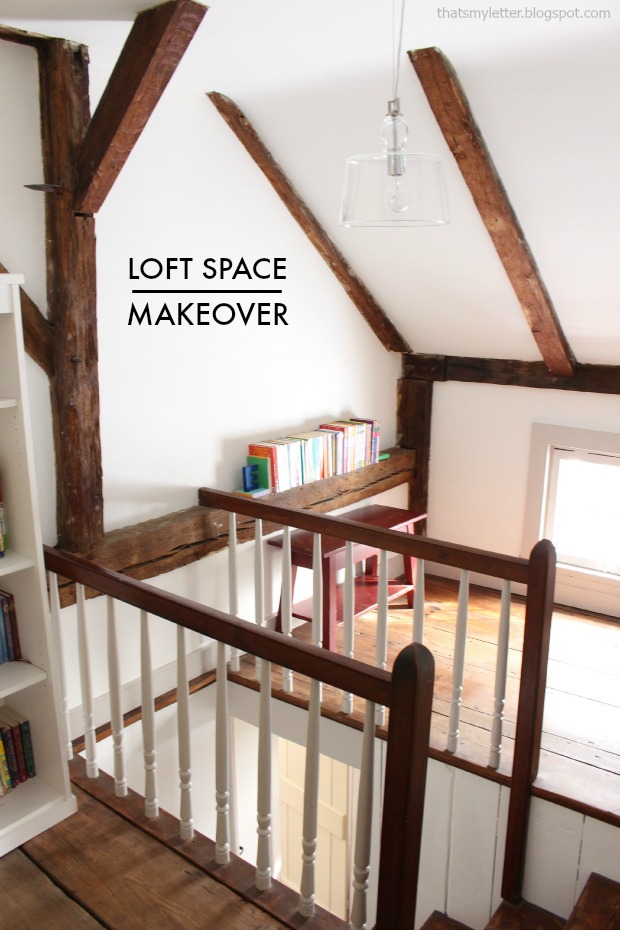
L is for Loft Space Makeover

loft space with ceiling beams

Another peek into our home today and we're up on the second floor in the loft space.  Two weeks ago I shared the backstairs and upstairs hallway space and that leads us to the front stairs and loft space.


To be honest this makeover really only needed paint and a new light fixture.  Unfortunately I don't have a before picture of the light but it was straight from 1984 with smoky glass and actually came down shortly after we moved in 18 months ago because I couldn't live with it.


Today the space is bright and fresh and clearly the highlight here are those exposed wood beams which are about 275 years old.  (Our house was built around 1740.)  I painted the walls Benjamin Moore simply white and the trim is London Fog.


That one horizontal beam makes the perfect ledge for books.  I used the kids diy book ends from Emma's build it birthday party here to hold up the books.
Click here to continue reading »
Read More..

Senin, 25 April 2016

P is for Project Poll

We want to hear from you!


As you may know my friend Jen from House of Wood and I will be teaching a building class at Haven this year and our class is specifically geared towards making a project that attendees can take home.

AKA: Make It / Take It


We want to know if you were to take our class which project would you like to build?


Create your own user feedback survey

We cant wait to meet up with all the Haven attendees in Atlanta this July.  (For more information about Haven click here.)  We want to make our class a fun and worthwhile time investment for beginner builders who are looking to complete a small project from start to finish and take it home too!

Thank you for your input and we look forward to seeing everyone at Haven. 
Read More..

Minggu, 17 April 2016

W is for Work Apron to Zippered Pouch

Make a zippered pouch from a work apron.


It's no secret I like to build but equally I like to sew too.  Recently I made a quick trip to The Home Depot headquarters in Atlanta for the DIY Workshop kick off and amongst all the goodies they gave us was this work apron:


Super functional and lightweight, it's great for woodworking, gardening, etc but I got to thinking the canvas would make an awesome zippered pouch.  These work aprons are available at The Home Depot for an extremely economical .77 cents each so I bought a few more and made some pouches:

Click here to continue reading »
Read More..

Kamis, 14 April 2016

B is for Build Besties Part 1

 Build Besties: Part One


A warm woody hello to all my buildy readers.  Im feeling the need to share and acknowledge my DIY blogger community so today I present some of my build besties.  We all build furniture and share a love for making pieces out of wood for our homes and the people we love.  This is definitely not a complete list, there will be more to come I promise!

Below are brief snippets of these build besties which I guarantee does not do them justice - please go visit their blogs to see much more!
Read More..

Rabu, 13 April 2016

K is for Kids Cubby Organizer One Board Project


We have seven birthday parties next week during the last week of school.  Yes seven.  Instead of running to the store to buy more plastic toys wrapped in plastic I pillaged my scrap wood pile and built a kids cubby organizer.

This is a one board project meaning you could build this organizer from one (1x4) eight foot board which costs about $5.  Or you could use scrap wood and then it's a free project.


Two down, five to go!

I'm sharing the free plans down below including materials, cut list and step by step instructions.

Click here to continue reading »
Read More..

Senin, 21 Maret 2016

Mailbox Debate Post or Wall


Secretly I really love a big mailbox on a post at the end of the driveway.  Perhaps because thats how I grew up, running to the end of the driveway to see what that big black box would deliver.  However, in our current neighborhood all the mailboxes are right at the house (which I must say makes it so easy especially in bad weather thank you US Postal!) but let me show you the before:


Yes theres the beautiful copper mailbox on a post right by the back door.  As convenient as it may be it was also an eye sore and a problem for a few reasons.


1. The garbage men need access to that gate right behind the mailbox and it was sort of blocking the pathway.
2. The door on the mailbox was ripped and hard to close.
3. Size - its super big.  Were a family of five and never ever did we come close to filling that mailbox.  Granted it is good space for small packages but those can be left just inside the storm door.


So I removed the mailbox cutting down the post and hung a wall mounted version.  Its streamlined now and I can guarantee I wont have any of the garbage men telling me they cut themselves on the ripped metal of the old mailbox.


I placed my diy planter in the corner with a fern and Im loving the new look already.  Im still a little bit sad about not having a mailbox on a post but this back door refresh is working just swell. 


Im linking up to:
TDC Before and After
Read More..